
Alright, everyone! Here is the tutorial I promised of how I designed and constructed the Trafalgar Dress!
 This dress isn't 100% perfect by my standards but I had never done this technique before this and am still getting a hold on it. But it's an exciting technique that has changed entirely how I design now.
What you'll need:
I attended the webinar that BurdaStyle did mostly about the technique Japanese designer Shingo Sato applies to his garments. I'll eventually be buying his book. If you're a fan of the Pattern Magic series, then you'll definitely appreciate his work.
First thing's first - you will need to make a muslin in the shape of the garment you're planning to make. Much of my pattern work consists of simple silhouettes with color design inset pieces. I just like the contrast of these elements. I assume you can use any fitted pattern you like, but I used my customized blocks in my size.
 Here, I have traced off my blocks onto muslin fabric. For this one, I made a full muslin but this technique can be used with a half muslin for symmetrical designs if preferred. I know I'll be playing with more symmetry in upcoming pieces!
Next, sew up your muslin as-is and pin it onto your dressform.

 Here's the design I came up with. One line extends slightly over center front. It's best to pencil in your markings first, then when you like what you have drawn, go ahead and use a Sharpie over it.
Looking back, I should have used a ruler for my lines to make them more exacting on here while drawing on the dressform, but I thought I could just true it up once I got it onto paper.
Like I said, this is the first time I did this! Bound to be minor errors.
One thing to note while doing your design is that you MUST cross lines through the dart apex (the end point of your dart near the bust point). I'm assuming that this is so your pattern will be flat once you cut on your lines as well as go back into a 3-dimensional shape once sewn back together, but I don't remember a reason given on the webinar.
 I also continued the design all the way around the back, stopping at the back zip.
It's not shown in these photos, but I did change the neckline on the dressform and incorporated that change into the cutting of my pattern pieces.
Now, you can do many, many different designs. Use your imagination! I just chose this sort of design because I thought it would be relatively easy for my first one.

 I also made a lining at this point which I didn't use because I ended up finishing off the fabric ends neatly with a different serger stitch (I'll be getting to that in a minute.)
 Next, carefully cut along all your design lines, leaving the darts intact. These will become your new seam lines for your garment.
 Here is what I ended up with. The contrast pieces are actually going to be sewn where the front bodice is shown and there is one extra pattern piece that combines both front and back all the way to the back zipper. For this design, did open up the right side dart because I didn't cross any lines over that area and still needed the shaping in the garment.
At this point, it's also a good idea to label your center front (CF), center back (CB), and where your side seams are/used to be. I notated mine on my pattern with a notch on each side of the side seam.
 Next, take each piece that you have cut and trace around them onto some pattern paper. These will become your new pattern pieces. You can see in this photo I have a front and back combo piece which is part of the side neckline on the front and contrast pieces go below the bottom seam on here.
Also note that any enclosed seam you have should have a 1/4" seam allowance. Otherwise, all other seams are 1/2" seam allowance. So basically for this, only my shoulders and armholes had the 1/2" seam allowance.
You do want to go ahead and make your facing pieces if you're not using a lining. I actually made my facing pieces from the lining pattern I created since they both were the same size. My facing pieces ended up a combo facing, including both neckline and armholes in one since it was sleeveless.

 A closer look at the contrast pieces. Sorry for the glare on the paper - I have a bright light overhead and sometimes even I can't see well as I'm working on things because it glares when I'm up there!
That's really about it! I was told that grain lines more or less really don't matter with this sort of technique, but I kept my grainlines quite leveled up with how a grain line would be on the front, less concerned about the grainline on the pieces that stretched around the back.
 So here is the fabric of the dress in-progress. I ended up finishing off the raw edges on my serger with a fine, close stitch instead of the normal loopy and loose stitch.
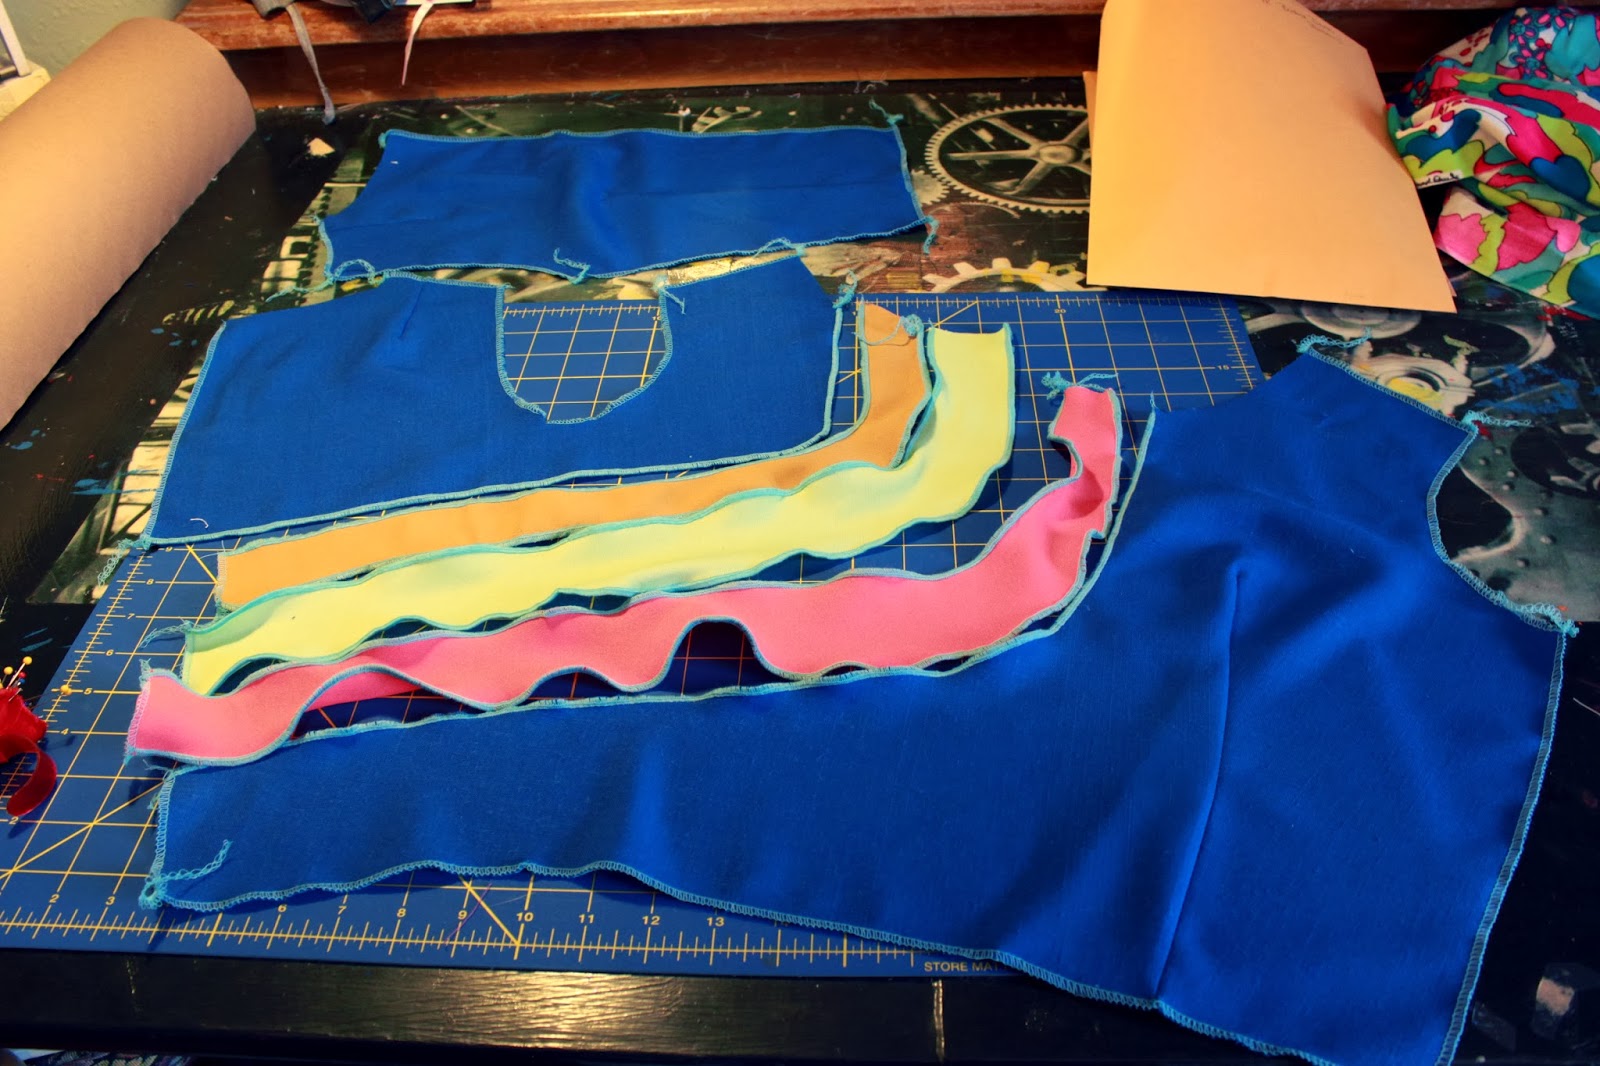
 This is how the pattern pieces overall were being sewn together. The bottom 5 pieces of fabric are right side front and back pieces with the darts sewn.
The other blue piece at the very top is my lone back pattern piece which is the same as the pattern block. Note: if you do this, still match up your CB seam of what you traced out along with your original pattern block CB seam. I somehow ended up with slightly less on my CB seam overall measurement on ONE side which made the zipper hard to put in. This is due to slight error in tracing. It could have slightly been due to sewing but I was fairly precise in that.
 Here's the bodice being sewn together! In between the pins is where I marked to re-stitch since the seam was a little more wobbly than I wanted it to be. Also, the pink fabric was cut slightly off-grain which is why it's more bunchy than the rest of the contrast pieces.
Also noted earlier I wish I had been a little more precise in drawing my lines on the dressform because they're a little more wobbly than I thought, even after truing it during the pattern making process.
Again, I also used the skirt pattern I made in May for the Castle Dress to cut the skirt for this pattern since the bodice seam is the same size as the waist seam.
 Finished dress! Try it out and feel free to post either here in the comments or on the Facebook page of what you make! I want to see!

What you'll need:
- Pattern blocks (or a fitted pattern you like)
- Drafting paper
- Pencils
- Ruler set - straight, hip curve, french curve
- Pins
- Thread/fabric/sewing machine
- Muslin
- Dressform
I attended the webinar that BurdaStyle did mostly about the technique Japanese designer Shingo Sato applies to his garments. I'll eventually be buying his book. If you're a fan of the Pattern Magic series, then you'll definitely appreciate his work.
First thing's first - you will need to make a muslin in the shape of the garment you're planning to make. Much of my pattern work consists of simple silhouettes with color design inset pieces. I just like the contrast of these elements. I assume you can use any fitted pattern you like, but I used my customized blocks in my size.

Next, sew up your muslin as-is and pin it onto your dressform.

Yep. I have quite a janky dressform as she never stands very straight! But sure am glad to have her.

Looking back, I should have used a ruler for my lines to make them more exacting on here while drawing on the dressform, but I thought I could just true it up once I got it onto paper.
Like I said, this is the first time I did this! Bound to be minor errors.
One thing to note while doing your design is that you MUST cross lines through the dart apex (the end point of your dart near the bust point). I'm assuming that this is so your pattern will be flat once you cut on your lines as well as go back into a 3-dimensional shape once sewn back together, but I don't remember a reason given on the webinar.

It's not shown in these photos, but I did change the neckline on the dressform and incorporated that change into the cutting of my pattern pieces.
Now, you can do many, many different designs. Use your imagination! I just chose this sort of design because I thought it would be relatively easy for my first one.

Here's my muslin all laid out before cutting.


At this point, it's also a good idea to label your center front (CF), center back (CB), and where your side seams are/used to be. I notated mine on my pattern with a notch on each side of the side seam.

Also note that any enclosed seam you have should have a 1/4" seam allowance. Otherwise, all other seams are 1/2" seam allowance. So basically for this, only my shoulders and armholes had the 1/2" seam allowance.
You do want to go ahead and make your facing pieces if you're not using a lining. I actually made my facing pieces from the lining pattern I created since they both were the same size. My facing pieces ended up a combo facing, including both neckline and armholes in one since it was sleeveless.

Front pieces traced out. Note the seam allowances and locations of them.

That's really about it! I was told that grain lines more or less really don't matter with this sort of technique, but I kept my grainlines quite leveled up with how a grain line would be on the front, less concerned about the grainline on the pieces that stretched around the back.

The other blue piece at the very top is my lone back pattern piece which is the same as the pattern block. Note: if you do this, still match up your CB seam of what you traced out along with your original pattern block CB seam. I somehow ended up with slightly less on my CB seam overall measurement on ONE side which made the zipper hard to put in. This is due to slight error in tracing. It could have slightly been due to sewing but I was fairly precise in that.

Also noted earlier I wish I had been a little more precise in drawing my lines on the dressform because they're a little more wobbly than I thought, even after truing it during the pattern making process.
Again, I also used the skirt pattern I made in May for the Castle Dress to cut the skirt for this pattern since the bodice seam is the same size as the waist seam.

Looks great!!! LOVE the tutorial!
ReplyDeleteoh wow! so that's how you do it? I always have trouble going around the corners. even princess seams trip me up sometimes. Do you have any suggestions for that? thanks!
ReplyDeleteMy best suggestion on curves is really just a lot of pinning! I also tend to sew a curve with the flattest pattern piece down on the machine since you will avoid catching the fabric while you sew. Sewing this bodice actually went pretty quickly!
DeleteThe pink curve in the bodice still bothers me when I look at this dress! Problem? I cut that one piece off-grain because I was told that "grainlines didn't matter" on an odd design like this. Wrong!