
So I got really excited on my break at work today when I got an email from Burda about a webinar they're doing on a pattern technique called "Transformational Reconstruction" developed by Japanese designer Shingo Sato.
I hadn't even heard of Shingo Sato until today let alone his design technique but oddly, it's sort of the path I'm going down with my designs anyway as seen with the Sunrise Panel dress as well as the Petra Dress and the pattern making involved in those designs. What I did there is perhaps a "light" version of Sato's where the darts and shaping are hidden in the seam lines.
If you've been reading this blog long enough, you know that my design aesthetic focuses largely on color blocking, unusual seam lines, and a love of anything psychedelic.
Note: All photos stolen from the internet. Sorry! I'm super-excited. Let me know if it's yours and I'll take it down.
Essentially, I think I can see how much of this is done. A whole section in my pattern making book is dedicated to shifting darts around, making them curvilinear, and taping your pieces closed depending upon your variously shaped slash lines though not quite to this degree of complexity. I probably could easily figure it out on my own, but it's good to have a class in something every now and again. I use the trial-and-error method far too often. Time to take an easier route for once?

Oddly enough, I also found a link to my former teacher Yoshi, at my old college, teaching a class on this! Someone on Flickr posted it. Transformational Reconstruction wasn't a "thing" back when I was in school otherwise I would have had her teach me this for sure. Yoshi taught me everything I know, really. Her classes were difficult and even though I may have gotten a C or B- from her, she was fantastic.
Quite a few years ago now, I also had a friend alongside me in design school who started me off on the path of using mostly solid colors and changing seam lines. He asked me one time after looking over my sketches why I designed with specific prints in mind. I hadn't thought of that, then he suggested I start playing with things that it didn't matter the color/pattern of the fabric like the seam lines. I guess it's really his credit for inspiring me to think beyond what I want the end result to look like and just focus on the pattern making aspect. In this way, I always have control over what the garment looks like and am not focused on finding that "right zigzag" or "perfect jacquard". If I want to add pattern in? Totally works!
And now, some more photos I found online:


I'm really beyond excited! I love new pattern making techniques. Is anyone else out there going to sign up for this webinar? It's here on BurdaStyle. I won't be home at the time of the broadcast, but they do give you a download of the webinar if you can't attend live online. Bonus: It's apparently being taught by a former student at my old college in Chicago. How nuts is that?
Other than that, I plan on cutting my fall jacket fabric Monday night but I have to run out and buy lining on Tuesday and get a box down to the post office. Nothing new from me for at least a week at this point, but I'll probably have more (and beautiful) exhibition photos to post.
I hadn't even heard of Shingo Sato until today let alone his design technique but oddly, it's sort of the path I'm going down with my designs anyway as seen with the Sunrise Panel dress as well as the Petra Dress and the pattern making involved in those designs. What I did there is perhaps a "light" version of Sato's where the darts and shaping are hidden in the seam lines.
If you've been reading this blog long enough, you know that my design aesthetic focuses largely on color blocking, unusual seam lines, and a love of anything psychedelic.
Note: All photos stolen from the internet. Sorry! I'm super-excited. Let me know if it's yours and I'll take it down.
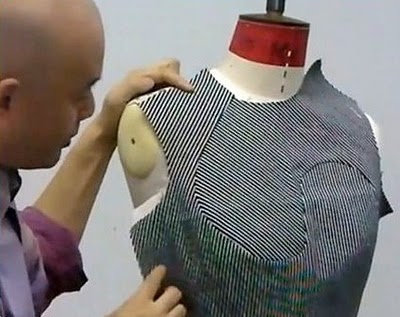 | ||||
| Shingo Sato teaching. |
 | ||
| More designs using Transformational Reconstruction. |
Essentially, I think I can see how much of this is done. A whole section in my pattern making book is dedicated to shifting darts around, making them curvilinear, and taping your pieces closed depending upon your variously shaped slash lines though not quite to this degree of complexity. I probably could easily figure it out on my own, but it's good to have a class in something every now and again. I use the trial-and-error method far too often. Time to take an easier route for once?
 |
| Sorry, not too many patterns online about this. |
 |
| Some absolutely GORGEOUS design work using this technique. Invisible zippers! |

Oddly enough, I also found a link to my former teacher Yoshi, at my old college, teaching a class on this! Someone on Flickr posted it. Transformational Reconstruction wasn't a "thing" back when I was in school otherwise I would have had her teach me this for sure. Yoshi taught me everything I know, really. Her classes were difficult and even though I may have gotten a C or B- from her, she was fantastic.
Quite a few years ago now, I also had a friend alongside me in design school who started me off on the path of using mostly solid colors and changing seam lines. He asked me one time after looking over my sketches why I designed with specific prints in mind. I hadn't thought of that, then he suggested I start playing with things that it didn't matter the color/pattern of the fabric like the seam lines. I guess it's really his credit for inspiring me to think beyond what I want the end result to look like and just focus on the pattern making aspect. In this way, I always have control over what the garment looks like and am not focused on finding that "right zigzag" or "perfect jacquard". If I want to add pattern in? Totally works!
And now, some more photos I found online:


I'm really beyond excited! I love new pattern making techniques. Is anyone else out there going to sign up for this webinar? It's here on BurdaStyle. I won't be home at the time of the broadcast, but they do give you a download of the webinar if you can't attend live online. Bonus: It's apparently being taught by a former student at my old college in Chicago. How nuts is that?
Other than that, I plan on cutting my fall jacket fabric Monday night but I have to run out and buy lining on Tuesday and get a box down to the post office. Nothing new from me for at least a week at this point, but I'll probably have more (and beautiful) exhibition photos to post.
wow! such amazing work! I'm always afraid to try these tricky seams in case they don't work out
ReplyDeleteThey are tricky, but if you make a muslin of your design first then you can do nearly anything!
DeleteHi I took a class on the shingo sato technique at my school and I am looking for another school to further my studies. I am curious what school does yoshi teach at so that I can inquire. Please and thank you.
ReplyDelete