
So my mom asked me to make her an apron for Christmas - and this is what she's getting!


Bear with me while I tell you how to construct this - I haven't written pattern directions since college which was about 4 years ago.
If you are a frequent sewer, all this will come quite naturally to you once you have the pattern pieces measured and cut. I use brown paper for all my sewing patterns. You can purchase a huge roll at Lowe's for what I remember to be under $10. I have enough paper to last me a few years at this point with one roll - and I make lots of patterns! (Oddly, their site doesn't say how much it costs, but this is the brown paper I use. )
To make the colorblock material, I cut strips of fabric in the desired colors that were 2" in width. These each had an added seam allowance of 1/2" on each side. So your colorblock pieces would be 3" in width total. Length is determined by the skirt pattern length which in my case is 16" long. I made the colorblocked skirt a little longer width altogether to gather the top seam at the waistband.
Note: This is meant to be used as a guideline. If you find or know an easier way to construct something, then do it! I learned too late in life that there is no "right" way to sew something. As long as your stitching is clean and the garment is functional and makes sense, then sew away!
1.) Cut all fabric.
2.) Attach front waistband to the apron skirt top seam, sewing 1/2" seam allowance. Sew one piece of apron front to the front waistband. Repeat these steps with the remaining and second pieces of apron front and front waistband.
3.) Sew the neckband on one long edge at 1/2" after folding in half. Turn. (After this is where I added detailed topstitching on the neckband.
4.) Pin or baste the neckband onto apron front, 1/2" away from each side. The neckband will align with the apron front when finished. Be careful at this point only to twist the neckband only once so it will lie flat. (Try it on after pinning to check.)
5.) Then sew both front apron pieces together at the top and side seams. (One piece will have the skirt attached.) Turn.
6.) Construct the apron ties. I folded these over 1/4" then 1/4" again to make a rolled hem, using 1/2" seam allowance. I also stitched the corner edges down one direction so you would have a pointed edge at the end of the apron tie.
7.) Insert the apron ties into the edge of the front waistband on both sides. Stitch on the right side. This is also where I stitched the waistband together with a decorative top stitch.
8.) Fold under inside of front waistband and stitch on the front side to lock down edges. This will still give you a nice topstitch but also hold in the seam on the other side.
9.) For front patch pockets: I attached a decorative lace, sewing this first. Then fold over pocket top 1/2" and another 1/2" for a rolled hem finish on the inside.
10.) Fold under 1/2" on the remaining 3 edges on each pocket and attach to front skirt in desired placement. (This was easy to do on mine because all I had to do was align my pockets with the colorblock strips!
11.) Decorative stitching can be done on the apron front at this point. You may notice I used contrast orange thread throughout the design of this apron.
Your apron should be done!
The fun thing about sewing an apron is that you really don't have to pay attention to many measurements, can design all sorts of things (like, try painting a design onto the skirt - I have a book of folk patterns that might look nice with a motif like that painted huge on the skirt), or colorblock like I did. Add decorative buttons to the pockets, use the decorative stitching setting on your machine... go nuts!
Either way, hope the pattern pieces and pattern sewing guidelines are helpful. This is a good project for a beginner and a fun one for a near-professional like me to do on a day off!

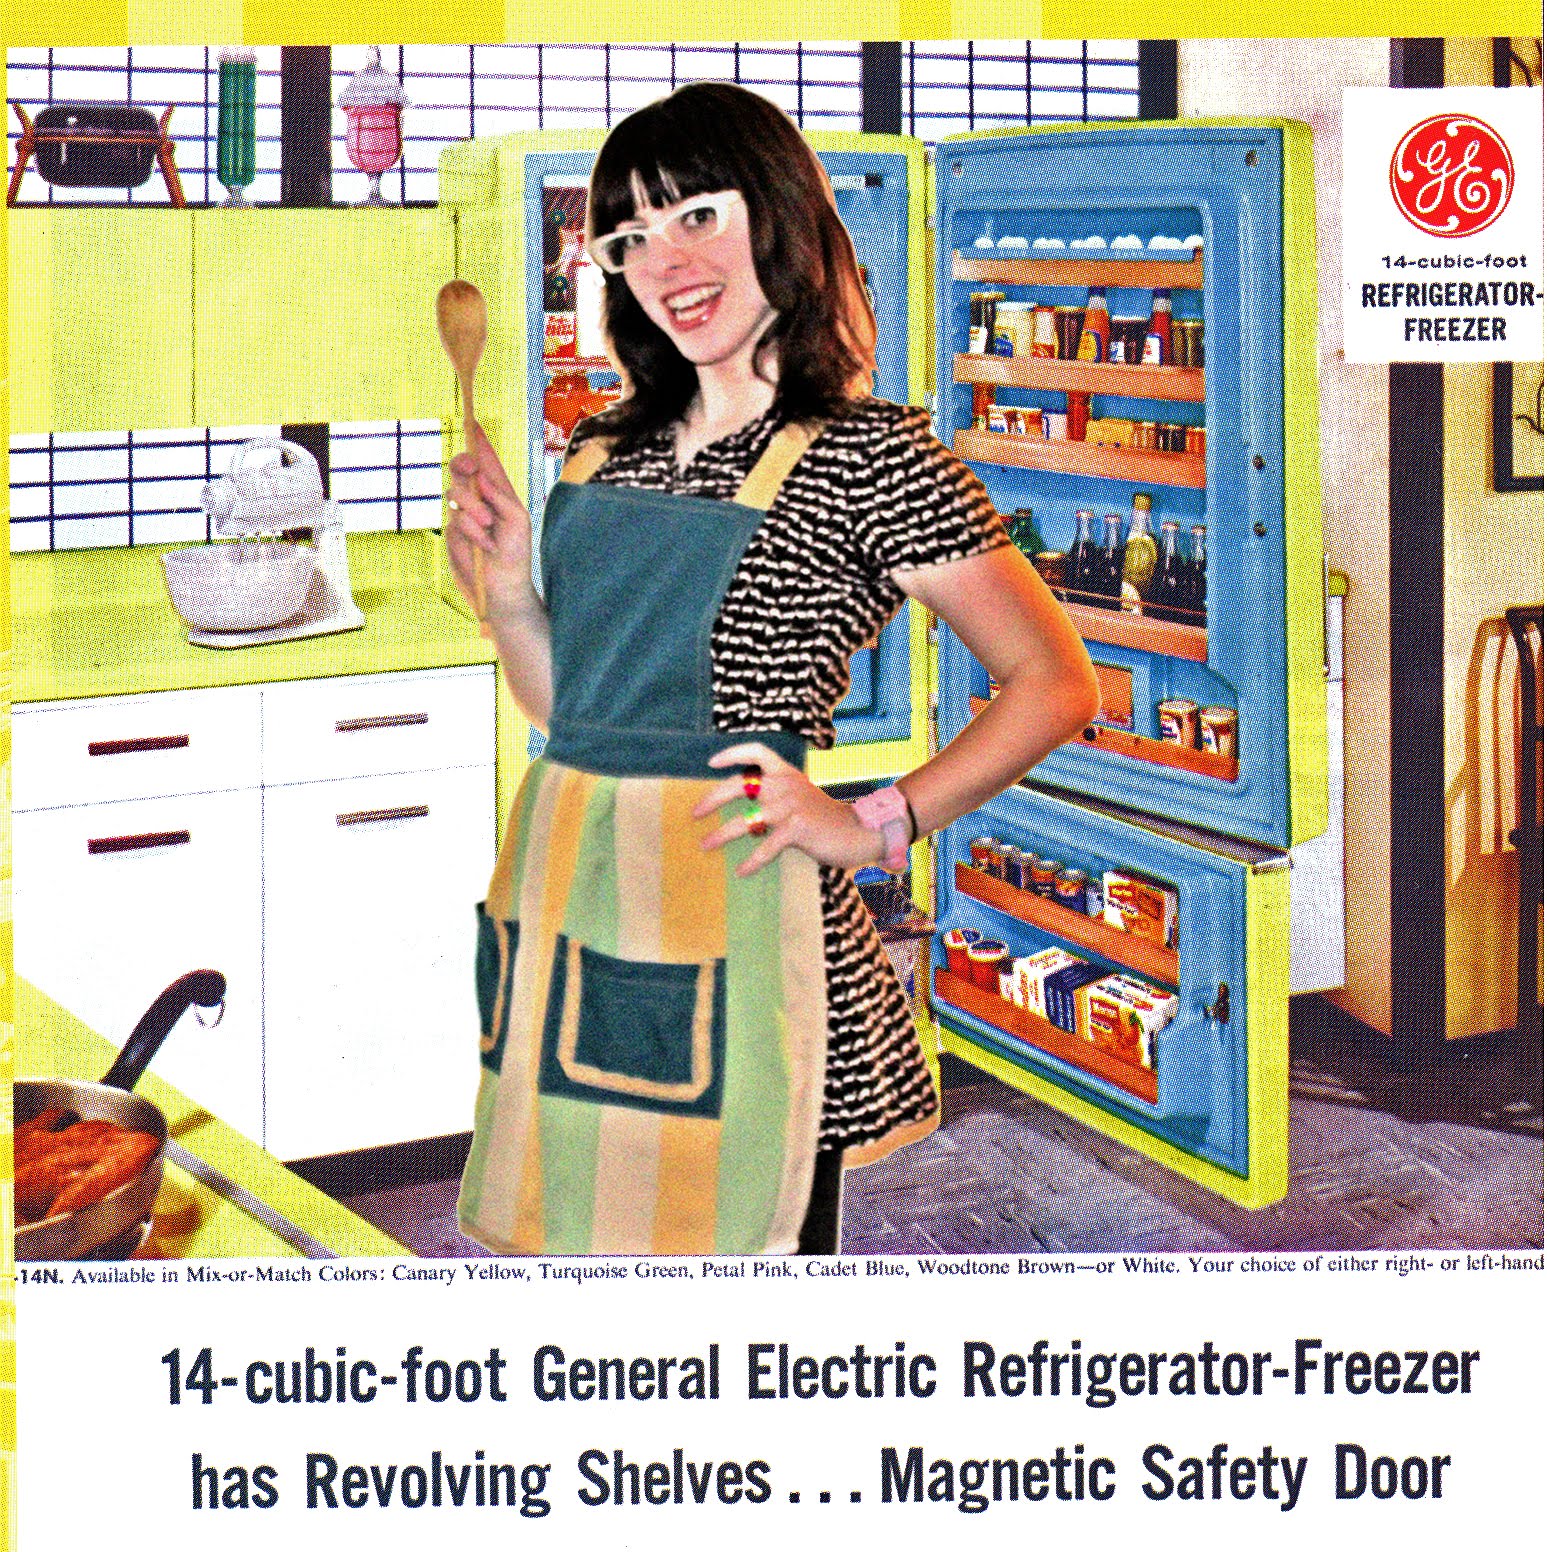
(I know, I'm super-dorky. And I'm still have way too much time on my hands to play with Photoshop. And yes, my face is meant to be scary-ish in a 50s/early 60s sort of way.)
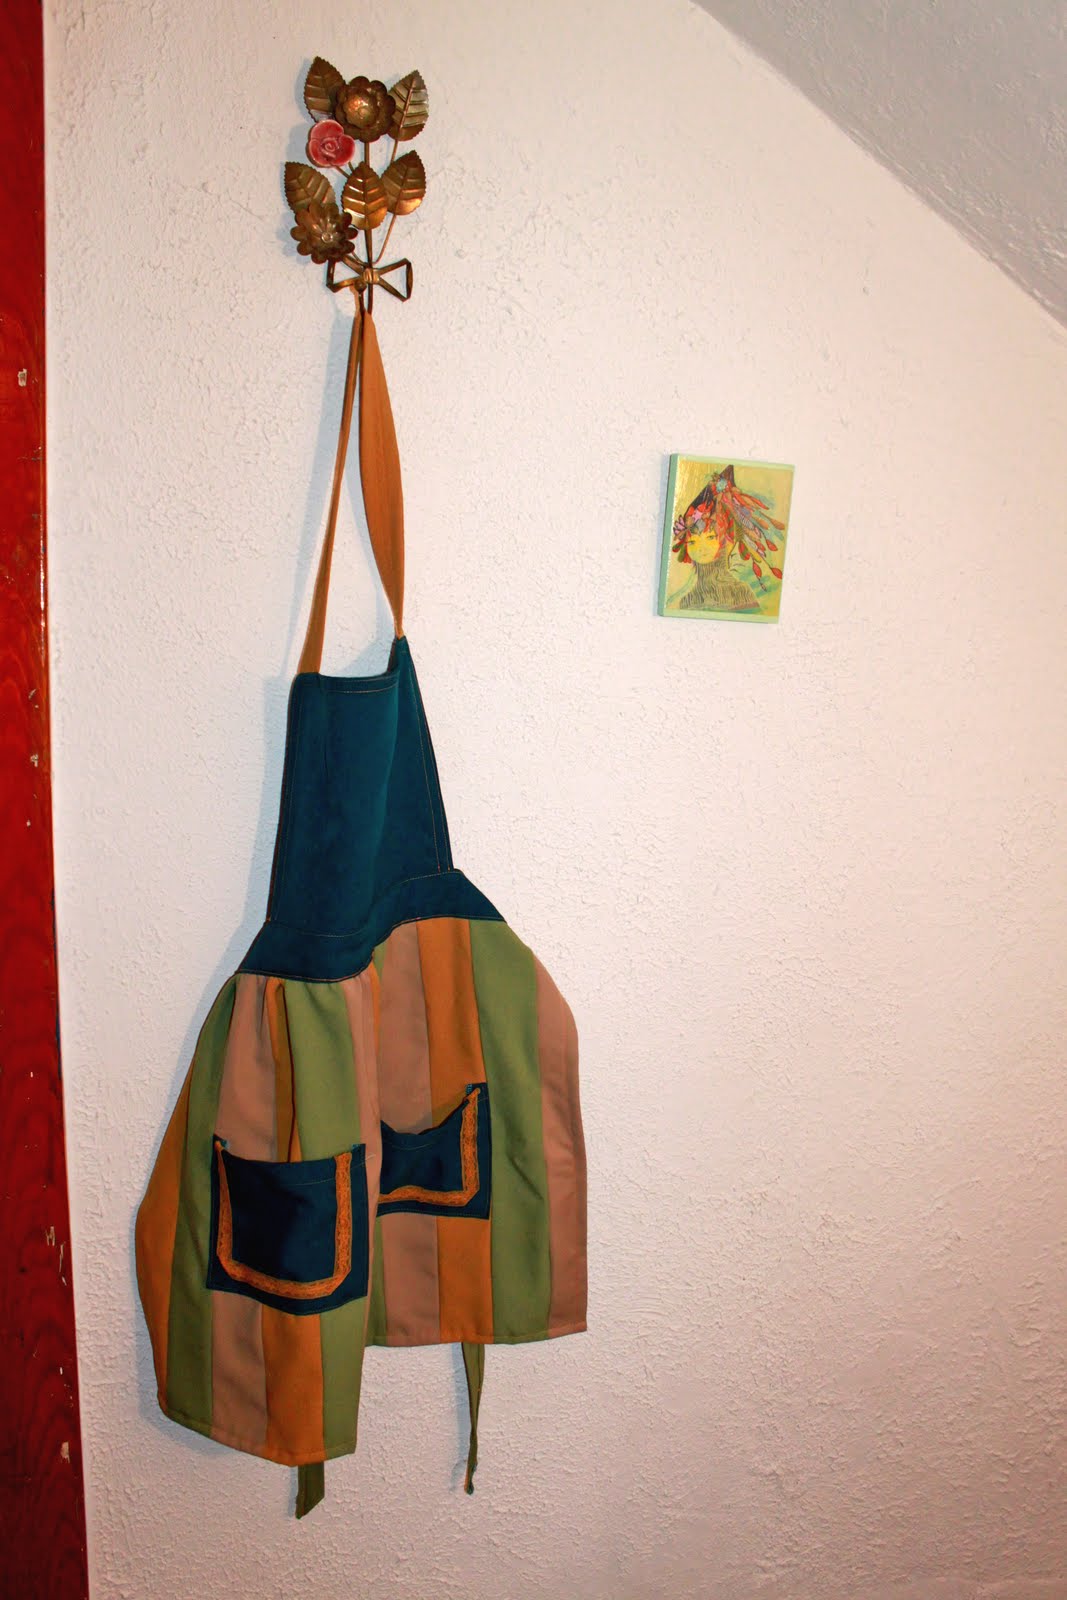
Detail of the apron.

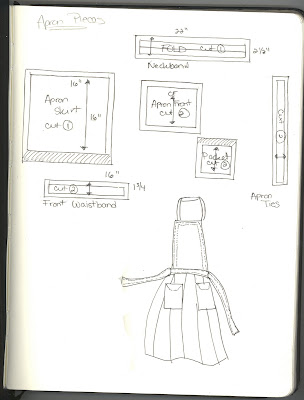
And here are the pattern pieces. These are drawn to scale with a 1/2" seam allowance around all edges except where indicated with lines. Striped seam allowances are 1". Each piece also says how many to cut, length and width as well as a marked grainline.
The pattern I made is essentially a close knock-off of the one I had in my house which my great-grandmother made from a shirt she never wore! This specific pattern is slightly larger than hers. I don't know if she made the pattern herself or if it was from a commercial pattern but I do know my mom says she used to go to this specific grandmother with a clothing design idea in her head and my great-grandmother would whip up a pattern in a matter of hours!
The pattern I made is essentially a close knock-off of the one I had in my house which my great-grandmother made from a shirt she never wore! This specific pattern is slightly larger than hers. I don't know if she made the pattern herself or if it was from a commercial pattern but I do know my mom says she used to go to this specific grandmother with a clothing design idea in her head and my great-grandmother would whip up a pattern in a matter of hours!

Bear with me while I tell you how to construct this - I haven't written pattern directions since college which was about 4 years ago.
If you are a frequent sewer, all this will come quite naturally to you once you have the pattern pieces measured and cut. I use brown paper for all my sewing patterns. You can purchase a huge roll at Lowe's for what I remember to be under $10. I have enough paper to last me a few years at this point with one roll - and I make lots of patterns! (Oddly, their site doesn't say how much it costs, but this is the brown paper I use. )
To make the colorblock material, I cut strips of fabric in the desired colors that were 2" in width. These each had an added seam allowance of 1/2" on each side. So your colorblock pieces would be 3" in width total. Length is determined by the skirt pattern length which in my case is 16" long. I made the colorblocked skirt a little longer width altogether to gather the top seam at the waistband.
Note: This is meant to be used as a guideline. If you find or know an easier way to construct something, then do it! I learned too late in life that there is no "right" way to sew something. As long as your stitching is clean and the garment is functional and makes sense, then sew away!
1.) Cut all fabric.
2.) Attach front waistband to the apron skirt top seam, sewing 1/2" seam allowance. Sew one piece of apron front to the front waistband. Repeat these steps with the remaining and second pieces of apron front and front waistband.
3.) Sew the neckband on one long edge at 1/2" after folding in half. Turn. (After this is where I added detailed topstitching on the neckband.
4.) Pin or baste the neckband onto apron front, 1/2" away from each side. The neckband will align with the apron front when finished. Be careful at this point only to twist the neckband only once so it will lie flat. (Try it on after pinning to check.)
5.) Then sew both front apron pieces together at the top and side seams. (One piece will have the skirt attached.) Turn.
6.) Construct the apron ties. I folded these over 1/4" then 1/4" again to make a rolled hem, using 1/2" seam allowance. I also stitched the corner edges down one direction so you would have a pointed edge at the end of the apron tie.
7.) Insert the apron ties into the edge of the front waistband on both sides. Stitch on the right side. This is also where I stitched the waistband together with a decorative top stitch.
8.) Fold under inside of front waistband and stitch on the front side to lock down edges. This will still give you a nice topstitch but also hold in the seam on the other side.
9.) For front patch pockets: I attached a decorative lace, sewing this first. Then fold over pocket top 1/2" and another 1/2" for a rolled hem finish on the inside.
10.) Fold under 1/2" on the remaining 3 edges on each pocket and attach to front skirt in desired placement. (This was easy to do on mine because all I had to do was align my pockets with the colorblock strips!
11.) Decorative stitching can be done on the apron front at this point. You may notice I used contrast orange thread throughout the design of this apron.
Your apron should be done!
The fun thing about sewing an apron is that you really don't have to pay attention to many measurements, can design all sorts of things (like, try painting a design onto the skirt - I have a book of folk patterns that might look nice with a motif like that painted huge on the skirt), or colorblock like I did. Add decorative buttons to the pockets, use the decorative stitching setting on your machine... go nuts!
Either way, hope the pattern pieces and pattern sewing guidelines are helpful. This is a good project for a beginner and a fun one for a near-professional like me to do on a day off!
I LOVE this apron. It is so fun- especially with the color choice and big pockets. What a wonderful gift!
ReplyDeleteSUCH a cute apron...love it!
ReplyDeleteAnnie
The Other Side of Gray