
If you follow me on Instagram (@manicpop) you know that for the past 3 months, I took on making my sister's wedding dress. While she actually got married on October 15th, 2016 (a full year prior) we scheduled a dinner for her and her husband for her 1 year anniversary.
My sister got married in a courthouse in Houston in a dress she really liked but was not the dress she envisioned and wished she had worn. (Had I known she would be getting married, of course I would have offered to make her dress!)
So here we are, January 2017 and I ask myself, "Wait, why don't I make her dress?" As always, it starts out with a sketch.
 Here is what I ended up drawing, front and back for her dress. She loves Regency style era dresses, a la Jane Austen time period, so this is the silhouette we went for.
She had fairly specific requests which meant I had to create the sewing pattern entirely from my own mind. We couldn't find a sewing pattern that mimicked what she wanted so I just went ahead and started draping.
Good thing I went to fashion design school!
So after the drawing, I started planning out my stylelines on my form. My sister and I are very similar measurements so I didn't have to do a lot of tinkering with fit. The main difference is that she is 2 inches taller than me!

She then notified me that a classic Regency style dress would have a corset-like underpinning for her to wear underneath, so she went ahead and ordered one as corsetry is not my forte.
So here I am, planning that all out. (All I have are cell phone photos, sorry!)


From there, I started working out my full muslin to test out everything. At this point, I was sewing most of the pattern pieces together rather than pinning them all into place for a more accurate fit.
 This is when the back mini-train started really coming together!


Once I had the corsetry underneath though, I realized that there would be some minor edits to be made. Some of the corset was peeking out from underneath the dress and we couldn't have that happen in the actual garment.
I also did a sleeve test, of course.


Next, it was all about shaping the hem and the hem facing. So I sat on the floor of my workroom and shaped.

And this is the back of the dress after the hem was figured out!


So after all that, it was finally time to lay out the dress, cut and sew!
I ended up placing paper down and taping it to my table so I would not ruin the white fabric we found for it. It's hard to see in photos, but the fabric we chose has a white-on-white stripe detail that is subtle.

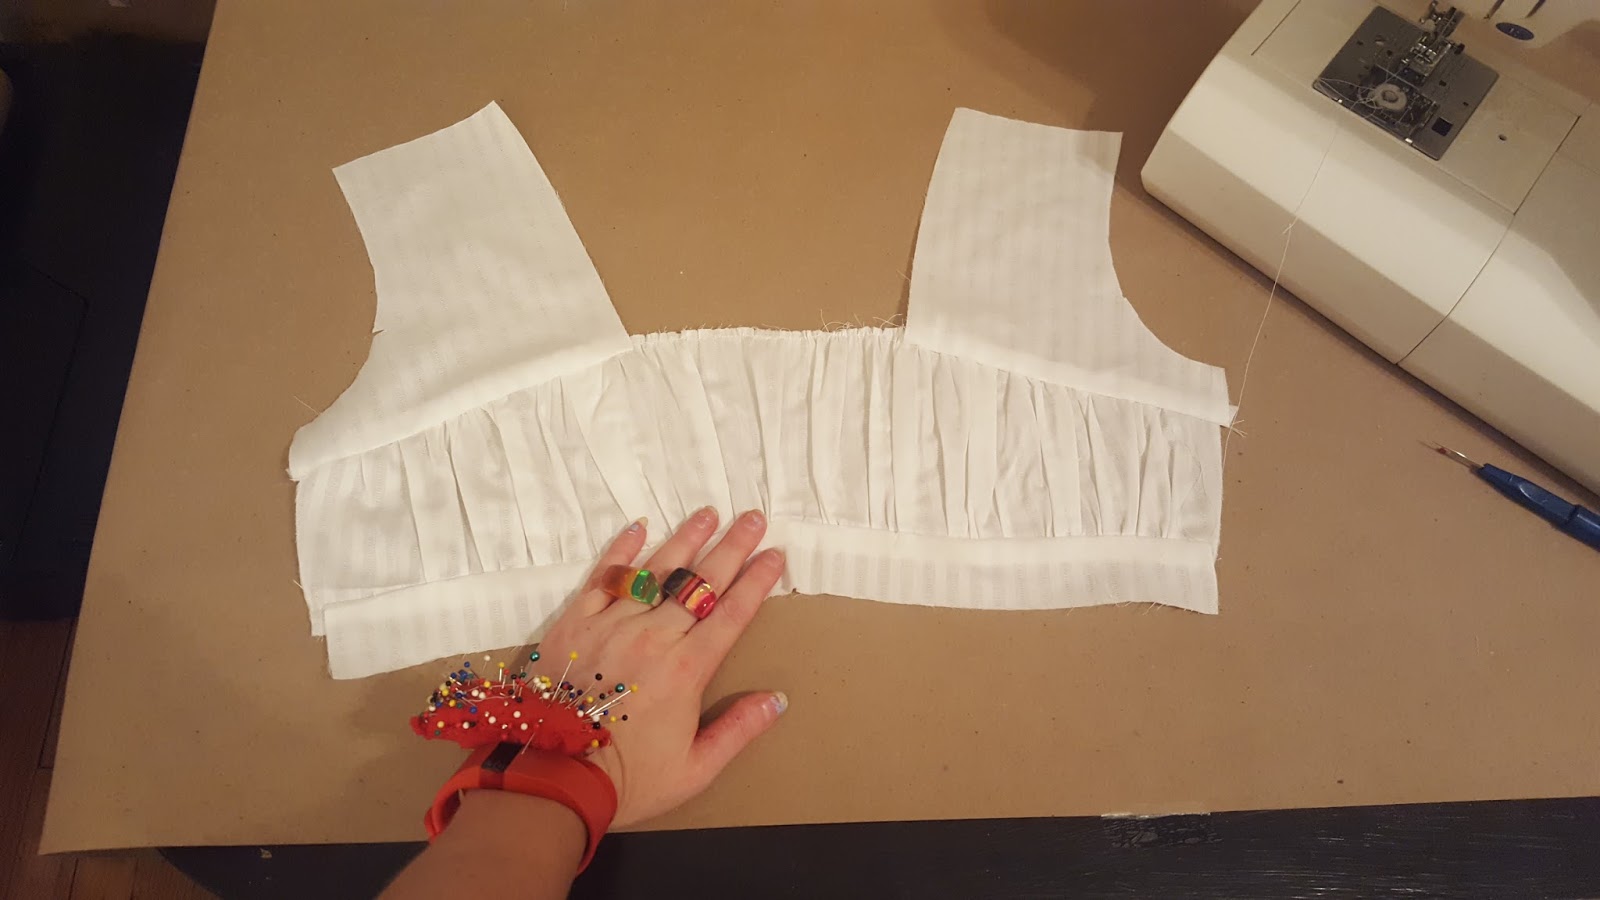
Here is me sewing the front bodice up!

Aaaand a bunch of photos of me sewing it all together!


I don't know why these photos look so low-quality (aside from the fact that they are my phone photos) but they look super blurry.


When it really started coming together, I tried it on one more time!

 And then it was finished! The dressform does it no justice if you ask me.


At this point, I was just so excited the 3-month long project was done. It would be one more month before the event, but it was all set to go!

And then.... the reveal! My sister and her husband just prior to us heading to the dinner.


And then some photos of everyone at the dinner. Here is me and my sister below.


 Of course, you had to see the glittery dress I wore that my friend Cindy found and gave me!
Then below, my parents and sister and her husband.

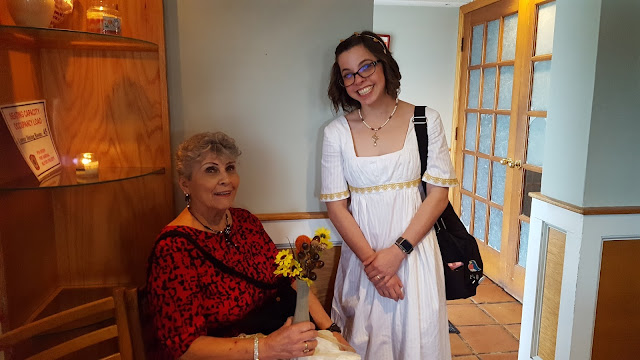
My sister with a grandmother.
And that's it! It was a long process, but it was worth it. Almost everything went off without a hitch and that is amazing to me. From the draping process, to the muslins, to the cutting, sewing, and it fit her perfectly when I couldn't even do any fittings on her! I mean, really -- how amazing is that?
Hope you all enjoyed this super-long photo-heavy post!
My sister got married in a courthouse in Houston in a dress she really liked but was not the dress she envisioned and wished she had worn. (Had I known she would be getting married, of course I would have offered to make her dress!)
So here we are, January 2017 and I ask myself, "Wait, why don't I make her dress?" As always, it starts out with a sketch.

She had fairly specific requests which meant I had to create the sewing pattern entirely from my own mind. We couldn't find a sewing pattern that mimicked what she wanted so I just went ahead and started draping.
Good thing I went to fashion design school!
So after the drawing, I started planning out my stylelines on my form. My sister and I are very similar measurements so I didn't have to do a lot of tinkering with fit. The main difference is that she is 2 inches taller than me!

She then notified me that a classic Regency style dress would have a corset-like underpinning for her to wear underneath, so she went ahead and ordered one as corsetry is not my forte.
So here I am, planning that all out. (All I have are cell phone photos, sorry!)

After that, I started draping! I don't really remember the last time I fully draped so I was referencing my old textbook from college about draping. It all started coming back to me, so I kept going with stylelines and started pin-fitting a half muslin to start.


After that, I started tracing off the pieces of what I draped for a full muslin set of patterns. These were not final patterns, but patterns I could use to construct the full muslin, make any adjustments with if necessary, and then work out more details.

Below is a photo of me using the original pattern (place on the book) for the bodice, and then the lower piece is how I decided to space out the gathers on the dress, eliminating the dart. I did keep the other piece of the bodice for lining patterns I also would need to make.

From there, I started working out my full muslin to test out everything. At this point, I was sewing most of the pattern pieces together rather than pinning them all into place for a more accurate fit.


So here is my 1st muslin fitting which actually went really well!


Once I had the corsetry underneath though, I realized that there would be some minor edits to be made. Some of the corset was peeking out from underneath the dress and we couldn't have that happen in the actual garment.
I also did a sleeve test, of course.

In the end, I really only needed to adjust the front shoulder a little due to the frame of my dressform and us being so small. This lifted the waistband up a little as well as the bust and made everything fit like it was supposed so. I also did some minor sleeve editing as the sleeve cap wasn't fitting correctly initially.

So here I am in what ended up being the final muslin fitting on her dress. (I also STILL made more edits on the sleeve after this photo.)

Next, it was all about shaping the hem and the hem facing. So I sat on the floor of my workroom and shaped.

And this is the back of the dress after the hem was figured out!

Bea helped too.

So after all that, it was finally time to lay out the dress, cut and sew!
I ended up placing paper down and taping it to my table so I would not ruin the white fabric we found for it. It's hard to see in photos, but the fabric we chose has a white-on-white stripe detail that is subtle.

Here is me sewing the front bodice up!


I don't know why these photos look so low-quality (aside from the fact that they are my phone photos) but they look super blurry.


When it really started coming together, I tried it on one more time!


At this point, I was just so excited the 3-month long project was done. It would be one more month before the event, but it was all set to go!

And then.... the reveal! My sister and her husband just prior to us heading to the dinner.


And then some photos of everyone at the dinner. Here is me and my sister below.


Then below, my parents and sister and her husband.

My sister with a grandmother.

And that's it! It was a long process, but it was worth it. Almost everything went off without a hitch and that is amazing to me. From the draping process, to the muslins, to the cutting, sewing, and it fit her perfectly when I couldn't even do any fittings on her! I mean, really -- how amazing is that?
Hope you all enjoyed this super-long photo-heavy post!
Comments
Post a Comment